Happy new rollcage day !
-
davew
- Chairman
- Posts: 2243
- Joined: Fri Jan 05, 2007 8:54 pm
- Location: Knaresborough
- Full Name: Dave White
Happy new rollcage day !
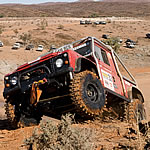
With 5 days to go before we have to travel to the Muddy Truckers Challenge, finally got my motor back from Protection and Performance with it's new roll cage.
Just got to put the interior back together again, put the winches back in, find somewhere for the ARB compressor to live, rewire all the earth circuits, strip and inspect the axles, give the engine a service and find my camping gear Good job I've taken next week off work !
Just got to put the interior back together again, put the winches back in, find somewhere for the ARB compressor to live, rewire all the earth circuits, strip and inspect the axles, give the engine a service and find my camping gear
You do not have the required permissions to view the files attached to this post.
that is very BLING dave - niiiice! 
Is that all stainless as well?
but how long will it stay looking that good?
Also, hows it attached to the chassis at the rear, i though the rear stays had to go straight down to the top of the chassis rails to maintain geometric strength?
Is that all stainless as well?
but how long will it stay looking that good?
Also, hows it attached to the chassis at the rear, i though the rear stays had to go straight down to the top of the chassis rails to maintain geometric strength?
Bugger!
Another bloody dent...
Another bloody dent...
-
davew
- Chairman
- Posts: 2243
- Joined: Fri Jan 05, 2007 8:54 pm
- Location: Knaresborough
- Full Name: Dave White
It's made from 54mm CDS, powder coated then laquered. Had a choice of black or silver and figured the silver would look better, especially after I've resprayed the rest of the motor in red. Should last a while, has done on the Ibex that were done this way a couple of years ago.
It's a compromise cage in many ways in the same way my last one was. This time though I wanted to free up as much space in the back as I could and getting rid of the internal hoop makes access to the areas behind the seats that much easier too. I can use the soft top I have or an Ifor Williams top with it too. I got them to add additional fixing points to the main hoop so I can add additional diagonals into the load bed if I ever need it to run in an MSA spec event. That'll mean chopping a couple of grooves in the roof though.
The rear end is (will be) braced to the old roll cage mounts at the moment and, as it will then be triangulated in all directions, it's not going anywhere. Gives improved tree protection too as once a tree is picked up at the front hoop it's got a smooth transition all the way to the back. Going to add some corner wraparounds at the rear that will protect the rear lights. Long term I'm thinking of replacing the rear cross member with a new version that will be strengthened and possibly extended all the way up to the rear cage mount. I won't be able to take the exhaust for the new engine through the existing rear cross member as it will be 2.5 or 3 inch diameter exhaust.
I asked for a full diagonal cross on the roof between the inner bars and the 2 hoops that you can't see in the pics. That way an impact on a front corner will be transferred to both bracing bars.
Not immediately obvious but I've also added some more substantial rock/tree sliders that further link the 2 hoops together at the bottom. I won't bend these ones in a hurry !
-
Orange rover
- Posts: 107
- Joined: Sat Jan 06, 2007 4:09 pm
- Location: Doncaster
- Full Name: Martin Ellis
-
Orange rover
- Posts: 107
- Joined: Sat Jan 06, 2007 4:09 pm
- Location: Doncaster
- Full Name: Martin Ellis

Who is online
Users browsing this forum: No registered users and 78 guests