Corvette powered Defender
-
davew

- Chairman
- Posts: 2242
- Joined: Fri Jan 05, 2007 8:54 pm
- Location: Knaresborough
- Full Name: Dave White
Knew there was something I was going to do on Saturday night !
Saturday was spent "tinkering" and planning. Propshafts not back yet so can't make a start on the exhaust. Bolted the torque convertor up to the engine and tried to fit the guard/cover. This cover bridges the bottom of the gearbox to the engine, covering the bottom of the torque convertor and keeping all the crap out. The engine sump seems to be different to the one the cover was designed to fit so some modification/cutting with the grinder was needed to get it to fit properly. All good in the end though. Fitted the gearbox dipstick which, hopefully, will sit under the bulge in the new bonnet, save us having to bend it down lower. Patrick found/modified some hydraulic fittings that will fit onto the gearbox oil cooler outlet/inlet, until the custom rad and oil cooler are made up we'll just put a hose between the two.
Decided that the front hydraulic bump stops will fit just in front of the spring mounts which means I don't have to work out where to mount a 3rd shock mount. The steering box bolts will be a bugger to get to with them there but should be workable.
Did some prep work prior to moving the front brake pipes to the rear of the springs.
I stripped back the engine loom ready to extend and adapt it for the Megasquirt installation. Did the same on the other LS1 Defender and cut some of the multi-way connectors out so I can integrate them into the extended loom. Checked and re-catalogued all the wires/wire sizes just to make sure the extension loom has all the wires it needs !
Waiting on some bits and pieces to come from VWP and I'll build the new looms.Using thinwall cables in a braid cover so should blend in nicely with the original loom.
Sunday was spent messing with web sites and ordering stuff. Have booked next week off work so, if everything arrives in time and/or we can fabricate around the missing items, should make some real progress with, potentially, 9 days solid on it.
-
davew
- Chairman
- Posts: 2242
- Joined: Fri Jan 05, 2007 8:54 pm
- Location: Knaresborough
- Full Name: Dave White
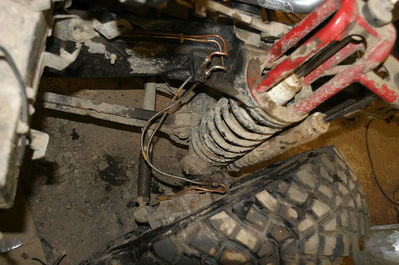
Hydraulic bump stops are round 10 inches long (fully extended) and have a very robust shaft coming out of the bottom that is aimed at a contact point on the axle. As the axle comes up and hits them they will cushion the impact, allowing the axle to continue it's travel upwards. The more compressed they are the more resistance.
In practice it means that when you hit a large hole at speed you don't get that "whiplash" effect and it allows the rest of the suspension to catch up and do it's job. I'm putting them on the back as well to help reduce the bouncing effect on washboard sections - although I'll still need decent rebound control from the shocks.
Some pictures of the type I am considering here:
http://www.allphaseoffroad.com/products.html?id=328
-
davew
- Chairman
- Posts: 2242
- Joined: Fri Jan 05, 2007 8:54 pm
- Location: Knaresborough
- Full Name: Dave White
Propshafts arrived during the week, as did the gear shift lever that I had to ship in from the US (love the exchanged rate at the moment !)
Fitted the propshafts first today, they are slightly different lengths (about 3 inches difference). Fitted the transfer box lever, to make positioning easier I'm using a Disco II lever which has a cable for high-low selection and a cable for the difflock. Needed to change the top part of the transfer box to fit the high-low cable but, fortunately, the required part was sat on a "junk" transfer box so no fabrication needed.
Assembling the new gearshift took ages ! It's a universal shifter which is designed to work with just about any gearbox. It comes in a 3 speed configuration but with all the parts needed to convert it to 4 speed. Eventually I managed to find the right combination of brackets and levers in the kit to work with my gearbox and, temporarily at least, got the lever attached to the seat box. Anyone driving it will need to pass an exam to use it... it'll take me a while to figure it out. Once it's in drive you use it like a sequential shift, pull it back to go down a gear, forwards to go up a gear. Put it into reverse and you can go direct to drive by pulling it back once... so don't park near me until I get used to it !
I've decided I'm going to fabricate a new gearbox tunnel, partly so I can mount the gearbox shifter and transfer lever somewhere more convenient and partly to give enough room to fit the 3 inch pipe for the snorkel alongside the gearbox as the snorkel is going in the back.
If I go over there tomorrow I'll take some photos.
For some reason the engine loom on my engine seems to have 3 more wires that the loom on the other Defender... spent some time counting and recounting wires, no matter how I counted it mine has 39 wires the other has 36. I'll make the extension loom with 39 and figure out the difference when I attach the extensions to the looms !
Hopefully the stainless steel for the exhaust will arrive on Monday - looks to be plenty of room for it, even once we've moved the gearbox crossmember back to give the front prop some more room.
I am really enjoying reading this - I just don't know how you manage to get so much done in such a short time! Well impressed 
(For comparison - yesterday I got four hours in and managed to weld up a few holes that I discovered when fitting the new body cross-member )
)
Looking forward to the pics.
Roger
(For comparison - yesterday I got four hours in and managed to weld up a few holes that I discovered when fitting the new body cross-member
Looking forward to the pics.
Roger
-
davew
- Chairman
- Posts: 2242
- Joined: Fri Jan 05, 2007 8:54 pm
- Location: Knaresborough
- Full Name: Dave White
First job today was moving the front brake pipes and making/modifying the brackets on the hubs accordingly. Took a while to figure out how to modify the brackets but, eventually, by swapping the brackets over from the opposite side and redrilling them a suitable compromise position was found. The flexi pipes are now well out of the way.
Once the brakes were done I then grabbed a pair of inner wings off the shelf and did a trial fit to see if they would need modifying in any way... they didn't. One of the exhaust pipes on the LHS comes close to the inner wing but it looks to be far enough away not to touch, even with torque twist.
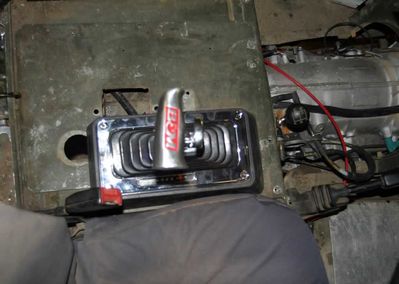
Here is a pic of the gearbox shifter (you can also see the cable operated transfer lever) - yet more bling bits
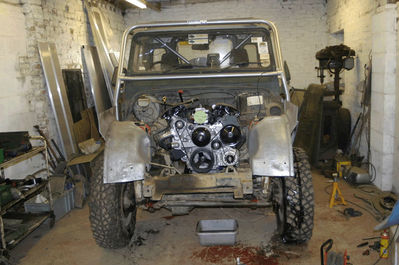
Last job of the day was to put the outer wings, front panel and winch on so that the radiator fabricator can come and measure it up to see how much room there is for the rad and gearbox oil cooler.
Hopefully he'll make it over tomorrow so he can start work on it. I'm taking the day off tomorrow, although I'll probably do some more work on the engine loom extension and Megasquirt. Hopefully the exhaust steel will arrive So I can look at that on Tuesday, plenty of other stuff still to do before she fires up though - power steering pipes, fuel pipes, water pipes, gearbox oil cooler pipes and so on, not to mention a shed load of wiring !
Once the brakes were done I then grabbed a pair of inner wings off the shelf and did a trial fit to see if they would need modifying in any way... they didn't. One of the exhaust pipes on the LHS comes close to the inner wing but it looks to be far enough away not to touch, even with torque twist.
Here is a pic of the gearbox shifter (you can also see the cable operated transfer lever) - yet more bling bits
Last job of the day was to put the outer wings, front panel and winch on so that the radiator fabricator can come and measure it up to see how much room there is for the rad and gearbox oil cooler.
Hopefully he'll make it over tomorrow so he can start work on it. I'm taking the day off tomorrow, although I'll probably do some more work on the engine loom extension and Megasquirt. Hopefully the exhaust steel will arrive So I can look at that on Tuesday, plenty of other stuff still to do before she fires up though - power steering pipes, fuel pipes, water pipes, gearbox oil cooler pipes and so on, not to mention a shed load of wiring !
-
davew
- Chairman
- Posts: 2242
- Joined: Fri Jan 05, 2007 8:54 pm
- Location: Knaresborough
- Full Name: Dave White
Managed to get one of the extension looms finished yesterday, took longer than anticipated, over 5 hours !
Bit of a slow day today, had some web work that needed doing before 1st August so spent a few hours of the morning tinkering with that, arrived at Maddisons just before lunch. Then spent 2 hours digging through "scrap" exhaust systems then new exhaust systems looking for suitably sized flanges to suit the header pipes. Couldn't find any of the right size but started cutting the stainless bends/pipes anyway and moved the gearbox cross member back so I could see how much space I have for the exhaust.
Have a rough layout of the exhaust sorted in my head but need some flanges before I can make any real progress with it. Took one of the headers to a laser cutting company near Masham and dropped it off for them to put the coordinates into the computer and cut some flanges from 8mm steel. Hopefully they'll be ready to pick up tomorrow afternoon !
The radiator guy didn't turn up so, assuming the laser cutters don't get the flanges sorted earlier than anticipated it looks like tomorrow will be "hydraulics day" which should see me visiting the local hydraulics places with a handful of pipes and connectors so I can get the power steering linked up. I'll try and get the loom extension connected up too... get the feeling that'll be a long job.
-
davew
- Chairman
- Posts: 2242
- Joined: Fri Jan 05, 2007 8:54 pm
- Location: Knaresborough
- Full Name: Dave White
Had a fairly productive day today.
The radiator man came and had a look/measure up and put a design together for the radiator and oil cooler. It'll take 2-3 weeks though which is a shame but, in the meantime, we can always run the engine up with the old radiator.
I joined the extension loom onto the engine loom and was pleased to find that all 43 wires had a matching wire in the extension. I even managed to identify which wires are missing from the earlier engine loom on the other Defender. Theoretically at least, I should now be able to plug the Megasquirt in and fire it up... bit of electronics work still needed first inside the Megasquirt ECU.
Patrick took a trip to the local hydraulics place and came back brandishing a couple of hydraulic pipes with suitable fittings for the power steering pump as well as a regulator that will allow me to adjust the pressure at the steering box (the LS1 pump runs at a pressure that can break the Land Rover box). I need to drop by the engineering supplies place in the morning to pick up a Y branch for the return pipe. A bit of brazing to attach a fitting to the pressure pipe at the box and the power steering wil be sorted.
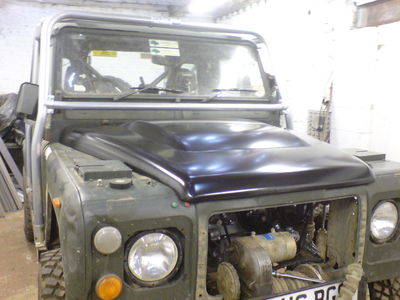
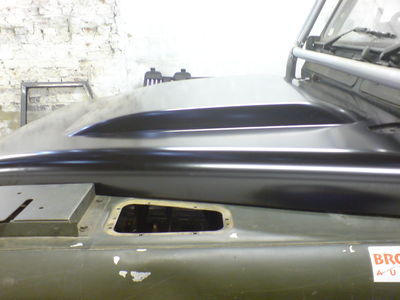
The new "transit" bonnet arrived today and we had a trial fitting. It looks the business and gives enough clearance that we don't have to bend the gearbox dipstick tube now. The structure of the bonnet gives some natural vent hole positions too. The extra room plus the vents should allow plenty of air circulation and keep the under-bonnet temperatures down.
The exhaust flanges are ready to collect tomorrow morning so I expect I'll spend most of tomorrow building the front part of the exhaust.
I didn't have a camera with me today so no pics of the bonnet, Patrick took a couple with his phone though so if he emails them over I'll post them here.
The radiator man came and had a look/measure up and put a design together for the radiator and oil cooler. It'll take 2-3 weeks though which is a shame but, in the meantime, we can always run the engine up with the old radiator.
I joined the extension loom onto the engine loom and was pleased to find that all 43 wires had a matching wire in the extension. I even managed to identify which wires are missing from the earlier engine loom on the other Defender. Theoretically at least, I should now be able to plug the Megasquirt in and fire it up... bit of electronics work still needed first inside the Megasquirt ECU.
Patrick took a trip to the local hydraulics place and came back brandishing a couple of hydraulic pipes with suitable fittings for the power steering pump as well as a regulator that will allow me to adjust the pressure at the steering box (the LS1 pump runs at a pressure that can break the Land Rover box). I need to drop by the engineering supplies place in the morning to pick up a Y branch for the return pipe. A bit of brazing to attach a fitting to the pressure pipe at the box and the power steering wil be sorted.
The new "transit" bonnet arrived today and we had a trial fitting. It looks the business and gives enough clearance that we don't have to bend the gearbox dipstick tube now. The structure of the bonnet gives some natural vent hole positions too. The extra room plus the vents should allow plenty of air circulation and keep the under-bonnet temperatures down.
The exhaust flanges are ready to collect tomorrow morning so I expect I'll spend most of tomorrow building the front part of the exhaust.
I didn't have a camera with me today so no pics of the bonnet, Patrick took a couple with his phone though so if he emails them over I'll post them here.
-
davew
- Chairman
- Posts: 2242
- Joined: Fri Jan 05, 2007 8:54 pm
- Location: Knaresborough
- Full Name: Dave White
As anticipated, today was exhaust day. Picked up the flanges in the morning and set to work cutting/welding the various pieces of stainless steel pipe bought for the job.
Took all day with lots of measuring, fitting, recutting etc but by the end of the day I managed to get pipes from both manifolds to a point where they will meet up with the silencer. I'm using a Range Rover sport silencer as it uses the same 2.5 inch pipework and has 2 inputs at one end and a single output, effectively supplying the Y branch for the exhaust.
One side still needs a bit more welding to finish it off as I ran out of MIG wire so will finish that tomorrow then sort out the fittings and pipes for the fuel system.
-
davew
- Chairman
- Posts: 2242
- Joined: Fri Jan 05, 2007 8:54 pm
- Location: Knaresborough
- Full Name: Dave White
Finished welding up the front section of the exhaust today, welded the lambda sensor boss on too, then started sorting out the pipes and fittings for the fuel system.
Managed to put together a list of fittings, pipe sizes and lengths and went shopping. The local dealer that stocks all the goodrich fittings had sold out of both pipe and fittings in the size I needed, new stock not due in until next week so that job is stuffed for a week
Not sure what tomorrow's job will be now, probably end up tidying up the vehicle wiring and hooking up some of the basics - starter supply etc... Better put some oil in the engine and gearboxes too !
-
davew
- Chairman
- Posts: 2242
- Joined: Fri Jan 05, 2007 8:54 pm
- Location: Knaresborough
- Full Name: Dave White
Another weekend comes and goes !
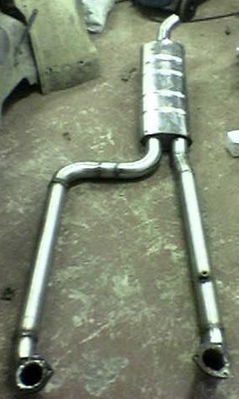
The silencer arrived this week so spent Saturday and part of Sunday mounting the silencer then extending and finishing the front pipes to meet the silencer.
The system is being fabricated from catering quality stainless steel, I bought a selection of 90 degree and 45 degree bends together with a few 1 metre lengths of straight pipe, all 2.5 inch diameter. The main silencer is also stainless, it's a copy of a Range Rover sport center box and has 2 2.5 inch inlets and 1 2.5 inch outlet so it acts as the Y piece too.
Picture of the welded up front section here...
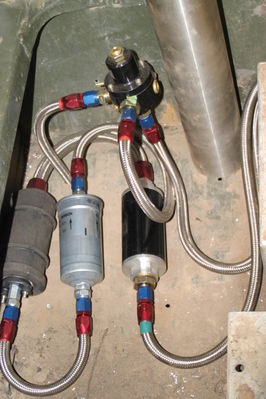
The remainder of Sunday was spent making up the fuel pipes, I miscalculated when ordering the finishers/connectors and ended up with 2 connectors less than I needed... have to finish that off next weekend. These aeroquip style connectors are a bitch to fit and my finger ends are now full of small holes thanks to the stainless braid. I managed to fit the pre-filter, pump, after-filter and regulator all in that area I wanted it to go in though and still have enough room for the snorkel to come through the same area, my idea of having spare filters already mounted in position went out of the window though !
The silencer arrived this week so spent Saturday and part of Sunday mounting the silencer then extending and finishing the front pipes to meet the silencer.
The system is being fabricated from catering quality stainless steel, I bought a selection of 90 degree and 45 degree bends together with a few 1 metre lengths of straight pipe, all 2.5 inch diameter. The main silencer is also stainless, it's a copy of a Range Rover sport center box and has 2 2.5 inch inlets and 1 2.5 inch outlet so it acts as the Y piece too.
Picture of the welded up front section here...
The remainder of Sunday was spent making up the fuel pipes, I miscalculated when ordering the finishers/connectors and ended up with 2 connectors less than I needed... have to finish that off next weekend. These aeroquip style connectors are a bitch to fit and my finger ends are now full of small holes thanks to the stainless braid. I managed to fit the pre-filter, pump, after-filter and regulator all in that area I wanted it to go in though and still have enough room for the snorkel to come through the same area, my idea of having spare filters already mounted in position went out of the window though !
-
davew
- Chairman
- Posts: 2242
- Joined: Fri Jan 05, 2007 8:54 pm
- Location: Knaresborough
- Full Name: Dave White
Finished off the fuel system today with the final aeroquip style connectors, they don't get any easier with practice but at least I know to where welding gloves now so my fingers are mostly intact !
Started making up all the new battery feed cables for the vehicle electrics, I've never liked the Land Rover method of distribution where all the power cables meet at the starter motor and have tried a number of different layouts in the past to avoid this. This time I've mounted the vehicle cut off switch on the bulkhead with a distribution block mounted next to it with heavy duty cables from the alternator and starter going to it. Still need to take a feed to the fuse box behind the seats and the 2 live feeds to the main vehicle loom. Should get that sorted tomorrow and can then sort out the power for the ECU and fans.
Started making up all the new battery feed cables for the vehicle electrics, I've never liked the Land Rover method of distribution where all the power cables meet at the starter motor and have tried a number of different layouts in the past to avoid this. This time I've mounted the vehicle cut off switch on the bulkhead with a distribution block mounted next to it with heavy duty cables from the alternator and starter going to it. Still need to take a feed to the fuse box behind the seats and the 2 live feeds to the main vehicle loom. Should get that sorted tomorrow and can then sort out the power for the ECU and fans.
Who is online
Users browsing this forum: No registered users and 35 guests