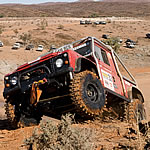
Rebuilding Pam's 90
-
davew
- Chairman
- Posts: 2242
- Joined: Fri Jan 05, 2007 8:54 pm
- Location: Knaresborough
- Full Name: Dave White
Got some more done today. Started by removing both front wings and the bonnet this morning. I was wondering how I'd remove the bonnet on my own but not having a roof and windscreen made it a lot easier as I could stand on the front floor and lift it straight up and over the bulkhead. Once again Mr Angry Grinder was required to free off some of the bolts holding the wings on.
Fortunately all the bolts I fitted when I put the V8 into it were coated in copper slip at the time so it was a relief to start coming across bolts that would actually undo rather than making you fight them all the way and then shear off when you get them to the last thread !
The duck oil I put on the passenger side floor seemed to help as all the bolts came undone with a bit of persuasion and after removing the battery, gear lever. handbrake etc... the seat box and all the floor panels joined the growing pile of bodywork in the back garden.
The remainder of the day was spent separating the bulkhead from the engine and chassis, stripping out brake pipes, LPG pipes, steering and isolating the bulkhead wiring loom. Still got a bit more to do on the wiring as I need to label up all the black wires to the immobiliser before I can cut them from the engine loom. Once that's done I'll be ready to unbolt the bulkhead and lift it off... all the nuts have been liberally sprayed with duck oil already !
Dave - if those sideways facing fold up seats are genuine CSW jobbies, dont bin them.
i sold the 4 from the back of my 90csw on ebay 2 years ago and they went for £170!!! Guy who bought them also tried to pursuade me to remove the seatbelt anchor bar that runs behind them for another £100, but a) was too busy and couldnt be bothered b) i use them for securing loads in the back.
lots of people want those seats and seatbelt bars for converting standard hardtops to csw's - same goes for the glass side panels. I'd be tempted to sell the roof, sides, seats and seatbelt mounts as a job lot as a 'CSW conversion kit'
i'm sure Pam can find plenty of nice goodies for you to fit from the proceeds
Bugger!
Another bloody dent...
Another bloody dent...
-
pamw

- Official
- Posts: 270
- Joined: Fri Jan 05, 2007 11:02 pm
- Location: Knaresborough, N Yorkshire
- Full Name: Pam White
The seats are not genuine CSW, we fitted them when we built the vehicle. I bought them new from Exmoor trim though and they are both in good condition and ready to fit straight in - so I am hoping to sell them rather than bin them! They come with their own mounting plate but don't have seatbelts as I never bothered fitted any.
To clarify, this Defender came out of the dealer as a bog standard TDi hardtop basic model, so any additions/improvements were after-market, either done by the previous owner (Paul Williams - former YORC member) or by Dave for me.
The sides had been converted before I got it but the windows/frames are not AFAIK genuine LR parts. The roof is a basic smooth one and doesn't have alpine windows or sunroof. All are in good condition though so will hopefully sell.
Archaeology - my career in ruins !
-
davew
- Chairman
- Posts: 2242
- Joined: Fri Jan 05, 2007 8:54 pm
- Location: Knaresborough
- Full Name: Dave White
Have been out a few evenings this week and managed to get a few more jobs done in between the rain showers... barbecue summer my a**e.
Wednesday night I finally lifted the bulkhead off after marking up the wiring for the immobiliser and the LPG system. The rest of the wiring is all being replaced anyway so only have to worry about those.
Once again, most of the bulkhead to chassis bolts wouldn't move so the angle grinder came out to take care of them. Th eonly one that did undo was the one I swapped around when I fitted the V8.
The front bolt on the fuel tank undid with no problems but both rear bolts had to be cut off with the reciprocating saw and after some faffing about with hose clips the fuel tank was removed allowing access to the rear tub mounting bolts.
True to form every single bolt on the rear tub had to be cut away with the angle grinder. Not before I snapped a Torx drive socket though trying to undo one of them
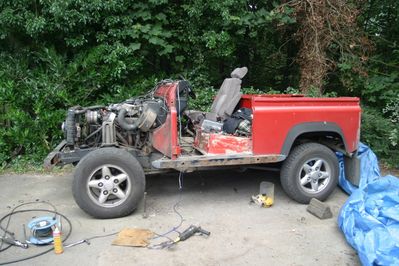
After a short session with Mr Angry Grinder the back body was free and could finally be lifted off... time for a beer now.
Hopefully I'll get the engine and box out tomorrow in between F1 qualifying and heading off to Maddison 4x4s BBQ. Then Sunday can be spent removing and stripping the axles and suspension ready for shot blasting... assuming I'm not too hung over to get outside before the F1 starts.
Wednesday night I finally lifted the bulkhead off after marking up the wiring for the immobiliser and the LPG system. The rest of the wiring is all being replaced anyway so only have to worry about those.
Once again, most of the bulkhead to chassis bolts wouldn't move so the angle grinder came out to take care of them. Th eonly one that did undo was the one I swapped around when I fitted the V8.
The front bolt on the fuel tank undid with no problems but both rear bolts had to be cut off with the reciprocating saw and after some faffing about with hose clips the fuel tank was removed allowing access to the rear tub mounting bolts.
True to form every single bolt on the rear tub had to be cut away with the angle grinder. Not before I snapped a Torx drive socket though trying to undo one of them
After a short session with Mr Angry Grinder the back body was free and could finally be lifted off... time for a beer now.
Hopefully I'll get the engine and box out tomorrow in between F1 qualifying and heading off to Maddison 4x4s BBQ. Then Sunday can be spent removing and stripping the axles and suspension ready for shot blasting... assuming I'm not too hung over to get outside before the F1 starts.
-
davew
- Chairman
- Posts: 2242
- Joined: Fri Jan 05, 2007 8:54 pm
- Location: Knaresborough
- Full Name: Dave White
Got everything I wanted to get done on Saturday done, culminating in the removal of the engine and gearbox before heading out for the party at Maddison 4x4. I decided to remove all the wiring and pipework from the engine and gearbox first to avoid any possible damage and close inspection of the radiator confirmed my suspicion that it will need to be replaced.
Sunday was a bit "fuzzy" all in all, I think one of the bottles of beer I drank at the party must have been off or something... or perhaps it was the quantity...
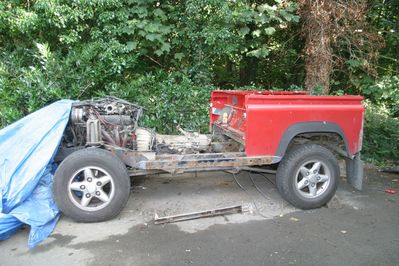
I did manage to remove most of the front suspension, the steering, prop shafts and most of the exhaust but it all had to be done at a slow, steady pace so my brain could keep up.
Picture from Saturday afternoon...
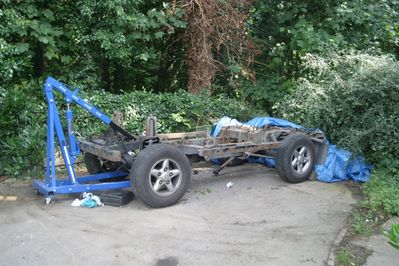
Hopefully I'll get a couple of evenings outside this week to finish off removing the axles and the remaining bits I want to keep from the chassis.
Sunday was a bit "fuzzy" all in all, I think one of the bottles of beer I drank at the party must have been off or something... or perhaps it was the quantity...
I did manage to remove most of the front suspension, the steering, prop shafts and most of the exhaust but it all had to be done at a slow, steady pace so my brain could keep up.
Picture from Saturday afternoon...
Hopefully I'll get a couple of evenings outside this week to finish off removing the axles and the remaining bits I want to keep from the chassis.
nicks90 wrote:Dave - if those sideways facing fold up seats are genuine CSW jobbies, dont bin them.
i sold the 4 from the back of my 90csw on ebay 2 years ago and they went for £170!!! Guy who bought them also tried to pursuade me to remove the seatbelt anchor bar that runs behind them for another £100, but a) was too busy and couldnt be bothered b) i use them for securing loads in the back.
lots of people want those seats and seatbelt bars for converting standard hardtops to csw's - same goes for the glass side panels. I'd be tempted to sell the roof, sides, seats and seatbelt mounts as a job lot as a 'CSW conversion kit'
i'm sure Pam can find plenty of nice goodies for you to fit from the proceeds
Down in the lock up is the rear seats out of the 110 including the seatbelt anchor bar!! Plus the middle seats as well. I wonder what they are worth??
I can not see them going back into the 110!
Brendan
-
davew
- Chairman
- Posts: 2242
- Joined: Fri Jan 05, 2007 8:54 pm
- Location: Knaresborough
- Full Name: Dave White
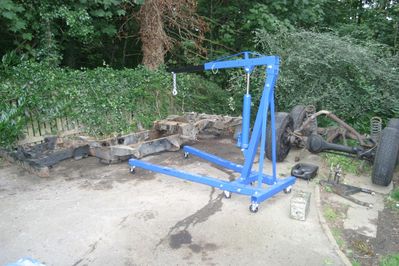
A long weekend and, in between rain showers, formula 1 and BBQs i managed to get a few hours plodding away on the mortal remains of Pam's 90.
Saturday went quite well, managed to get all the remaining bits off the old chassis that might be useful, stripped the loom out of it, all the old brake pipes (as templates) cross member and so on. Gave up on the tow hitch as I really don't have a use for it and it was showing no sign whatsoever of playing ball when it came to unbolting it !
By the end of the day on Saturday the axles, suspension and everything else was removed from the chassis so it's ready for the scrappers.
I expected to get both axles stripped ready for shot blasting on Sunday. Found out in the process that passenger side swivel will need rebuilding as it's got a distinct "notch" although there's no play in it as such, I'll probably rebuild both anyway and get some of the teflon coated swivels.
The front radius arms were reluctant to be removed from the axle so I spent a fair amount of time cutting through the bolts, not helped by running out of slitting disks with enough meat on them half way through.
With the front axle stripped I made a start on the rear axle but started to lose enthusiasm as the rain increased in intensity and I decided I wanted to be warm and dry so called it a day.
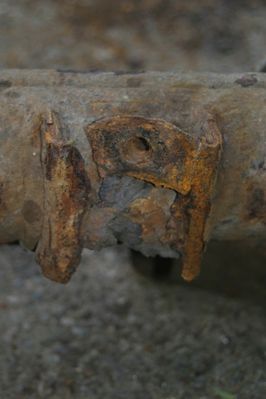
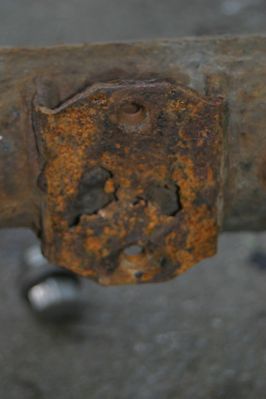
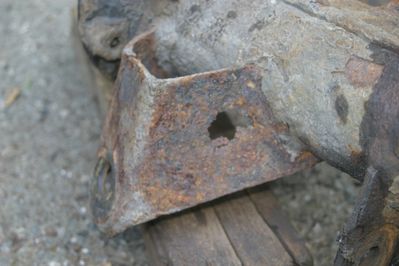
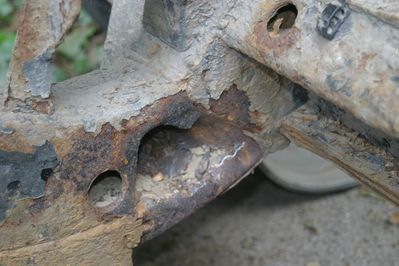
Taking the rear axle apart was pretty disheartening, it started off badly when removing the A-Frame ball joint from the axle turned into an hour long job - some days even your biggest sledgehammer isn't big enough ! When that finally gave up and popped out I started removing the springs. As I loosened the first of the two retaining bolts on the passenger side spring the whole assembly became unexpectedly loose and then fell off, revealing the very rotten remains of the bracket on the axle. The other spring mount was slightly better but was a long way from solid.
Further investigation with a large hammer revealed that the only thing holding the shock absorber mounts together was the underseal and as i chipped away the previously sound looking mounts grew larger and larger holes. The diff pan is holding together and is oil tight at the moment but it's looking really thin in places and, again, I suspect the paint was doing more to keep it sealed that the metal !
Whilst all the brackets and the diff pan are replaceable I don't think it's worth it for the time involved. I phoned around to try and source a replacement casing but only front ones were available. Pam found a brand new casing on ebay at a dealers for what I considered to be a fair price including delivery and after thinking about it for a while decided to take the plunge and buy it. On the plus side that won't need shot blasting so I can start building the rear axle and suspension up as soon as it arrives.
Saturday went quite well, managed to get all the remaining bits off the old chassis that might be useful, stripped the loom out of it, all the old brake pipes (as templates) cross member and so on. Gave up on the tow hitch as I really don't have a use for it and it was showing no sign whatsoever of playing ball when it came to unbolting it !
By the end of the day on Saturday the axles, suspension and everything else was removed from the chassis so it's ready for the scrappers.
I expected to get both axles stripped ready for shot blasting on Sunday. Found out in the process that passenger side swivel will need rebuilding as it's got a distinct "notch" although there's no play in it as such, I'll probably rebuild both anyway and get some of the teflon coated swivels.
The front radius arms were reluctant to be removed from the axle so I spent a fair amount of time cutting through the bolts, not helped by running out of slitting disks with enough meat on them half way through.
With the front axle stripped I made a start on the rear axle but started to lose enthusiasm as the rain increased in intensity and I decided I wanted to be warm and dry so called it a day.
Taking the rear axle apart was pretty disheartening, it started off badly when removing the A-Frame ball joint from the axle turned into an hour long job - some days even your biggest sledgehammer isn't big enough ! When that finally gave up and popped out I started removing the springs. As I loosened the first of the two retaining bolts on the passenger side spring the whole assembly became unexpectedly loose and then fell off, revealing the very rotten remains of the bracket on the axle. The other spring mount was slightly better but was a long way from solid.
Further investigation with a large hammer revealed that the only thing holding the shock absorber mounts together was the underseal and as i chipped away the previously sound looking mounts grew larger and larger holes. The diff pan is holding together and is oil tight at the moment but it's looking really thin in places and, again, I suspect the paint was doing more to keep it sealed that the metal !
Whilst all the brackets and the diff pan are replaceable I don't think it's worth it for the time involved. I phoned around to try and source a replacement casing but only front ones were available. Pam found a brand new casing on ebay at a dealers for what I considered to be a fair price including delivery and after thinking about it for a while decided to take the plunge and buy it. On the plus side that won't need shot blasting so I can start building the rear axle and suspension up as soon as it arrives.

-
davew
- Chairman
- Posts: 2242
- Joined: Fri Jan 05, 2007 8:54 pm
- Location: Knaresborough
- Full Name: Dave White
Just a quick update on current progress...
No progress at all on the body panels so I'm going to have to forget the original build plan and build it in a more "traditional" order. I'm on holiday at the moment so will try and get the chassis built up into a rolling chassis over the next week or so.
All the suspension components we are reusing and the front axle case were taken for shot blasting on Monday. I've stripped the bushes out of them all and will be using a new set of SuperPro bushes in them when they come back in the next day or so.
The new rear axle case has caused me a few head scratching moments, it seems the old rear axle, despite being metric in all other aspects, had UNF caliper bolts. The new case has M12 fine metric threads for the caliper bolts to go into. Problem solved with some new caliper bolts and a 12mm drill bit to drill out the holes in the calipers.
I figured out that the diff studs were just tapped in, a bit like wheel studs, so they were easy to move from the old axle. The axle breather is just a drilled hole - turns out that the axle breather isn't tapped into the casing but uses an insert.. you learn something new etc...
Painted the rear axle with "Zinga" today after stripping off the factory paint with some paint stripper. It's a Zinc paint that costs a small fortune so it'll be interesting to see how it holds up over time. I'll use an oil based chassis paint over the top of it. When the rest comes back form shot blasting I'll do the same with those bits too.
I've decided to change the steering drop arm over to the type without a ball joint in it so took the old one off the box this afternoon. I was quite pleasantly surprised at how easily it came off in the end, I only had to use a 2lb hammer - previously I've had to resort to a sledge hammer to shift one !
davew wrote:I've decided to change the steering drop arm over to the type without a ball joint in it so took the old one off the box this afternoon. I was quite pleasantly surprised at how easily it came off in the end, I only had to use a 2lb hammer - previously I've had to resort to a sledge hammer to shift one !
Easy? OK - I'll bring my 'spare' over and you and have a pop at that of you like!
Hi Dave, I have always used Galvafroid which is as the name implies a cold galvanising paint that contains 95% Zinc and have had excellent results. Half a litre weighs about 3kg. I had a chassis sat at the side of the house for 15 years (yeh I know, I was going to get around to it, alright!) that had been primed in Galvafroid and then painted in Chlorinated Rubber with no sign of rust after all that time. The Chlorinated Rubber has excellent adhesion, stands up to stone chips well and is fully water and chemical resistant so is good with salts and sheep dip.
Properties of the zinc based paints can be found here. http://www.nwepaints.co.uk/acatalog/info_605.html
Properties of the zinc based paints can be found here. http://www.nwepaints.co.uk/acatalog/info_605.html
5/4 of people admit that they’re bad with fractions.
-
davew
- Chairman
- Posts: 2242
- Joined: Fri Jan 05, 2007 8:54 pm
- Location: Knaresborough
- Full Name: Dave White
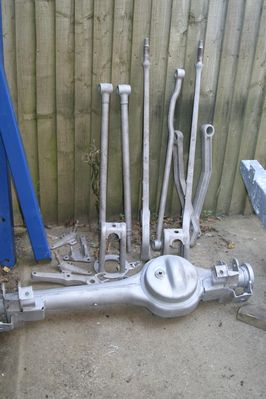
It's been AGES since i updated this, which doesn't mean nothing's been happening. progress has been "slow but steady". All the bits and pieces came back from shot blasting. The shot blasting revealed a couple of issues with the front axle which I patched up prior to painting.
The components back from blasting...
And after painting in zinc paint (later put a black topcoat on)
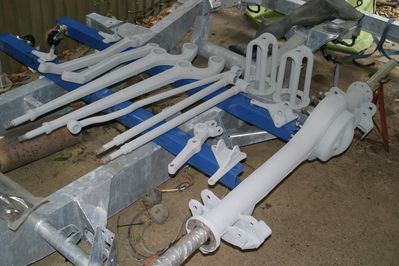
The components back from blasting...
And after painting in zinc paint (later put a black topcoat on)
Last edited by davew on Thu Nov 26, 2009 7:04 pm, edited 1 time in total.
-
davew
- Chairman
- Posts: 2242
- Joined: Fri Jan 05, 2007 8:54 pm
- Location: Knaresborough
- Full Name: Dave White
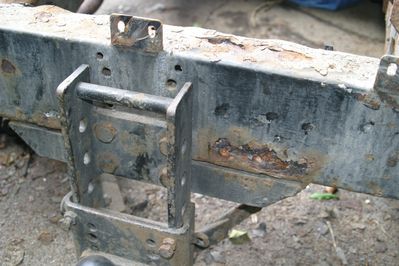
Here's some pics of the old chassis, the rear was in a very sorry state...
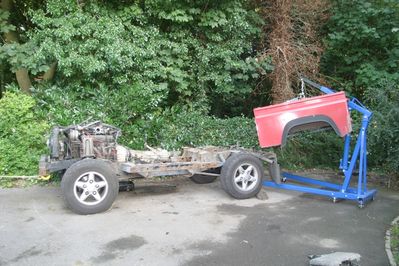
Anyway, out with the old as they say, this is a pic taken after a weekend fitting a SuperPro bush kit, fitting the hubs back on the axle cases and refitting the suspension components.
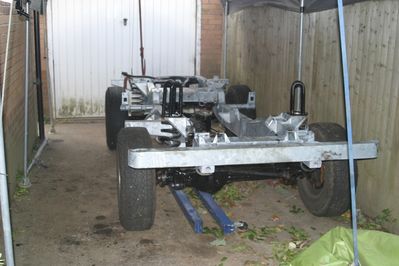
It was such a relief to finally get the new chassis off the ground and back into something resembling a rolling chassis !
Further delays on the bodywork front have meant that the focus has to be on getting the rear half of the chassis as complete as possible before the rear body goes on. I've asked for the rear body to be painted first as, with the limited room I have available I want to get it on and out of the way.
As well as fitting the fuel tank and it's pipework, the rear brake pipes and the rear harness I wanted to get the engine and box in so I could make up the new exhaust from above.
Anyway, out with the old as they say, this is a pic taken after a weekend fitting a SuperPro bush kit, fitting the hubs back on the axle cases and refitting the suspension components.
It was such a relief to finally get the new chassis off the ground and back into something resembling a rolling chassis !
Further delays on the bodywork front have meant that the focus has to be on getting the rear half of the chassis as complete as possible before the rear body goes on. I've asked for the rear body to be painted first as, with the limited room I have available I want to get it on and out of the way.
As well as fitting the fuel tank and it's pipework, the rear brake pipes and the rear harness I wanted to get the engine and box in so I could make up the new exhaust from above.
Last edited by davew on Thu Nov 26, 2009 7:04 pm, edited 1 time in total.
-
davew
- Chairman
- Posts: 2242
- Joined: Fri Jan 05, 2007 8:54 pm
- Location: Knaresborough
- Full Name: Dave White
Because of the age and condition of the Borg Warner viscous box that was originally fitted to Pam's 90 we decided that replacing it with an LT230, while undoubtedly noisier, would improve it's longevity.
The engine, gearbox and transfer box were easy to fit as a single unit with no bodywork on the chassis so only took a few hours.
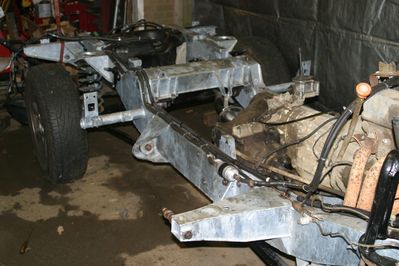
After a LOT of pontificating on the best way to secure the various pipes to the galvanised chassis without encouraging corrosion at some point in the future I eventually decided to go for the easy option. I used hex headed self drilling/self tapping screws and then after each was inserted I would them out again and coated them in Dinitrol and copper grease before reinserting them.
The pipes and cables could then be held using nylon P clips. By using hex head self tappers it means it should be simple enough to undo them, should the need arise, with the body on. It came as a surprise that the new rear harness I'd bought wasn't designed to go inside the chassis - the connectors wouldn't go through the holes. A quick phone call confirmed that the later vehicles run the harnesses outside the chassis.
The original exhaust form the Y piece back was in a sorry state for itself. the main silencer was intact as it was stainless but the pipes going into it fell apart when I tried to unbolt it and the rest of the pipework to the rear was done for.
Rather than buying an off the shelf replacement I decided to build a stainless one using parts from Jetex, buying a selection of bends and straights and welding them together. This took some extra time but the end result should last for a while and it fits in all the right places.
I mounted the fuel filter on the front outrigger where it is at least partially protected but most importantly it was about the only place I could find where it would be accessible with the body on !
More pics....
Fuel tank
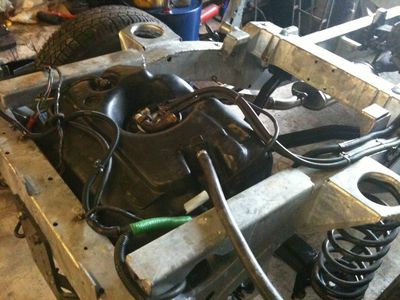
Fuel tank and exhaust

Fuel filter and pipes
The engine, gearbox and transfer box were easy to fit as a single unit with no bodywork on the chassis so only took a few hours.
After a LOT of pontificating on the best way to secure the various pipes to the galvanised chassis without encouraging corrosion at some point in the future I eventually decided to go for the easy option. I used hex headed self drilling/self tapping screws and then after each was inserted I would them out again and coated them in Dinitrol and copper grease before reinserting them.
The pipes and cables could then be held using nylon P clips. By using hex head self tappers it means it should be simple enough to undo them, should the need arise, with the body on. It came as a surprise that the new rear harness I'd bought wasn't designed to go inside the chassis - the connectors wouldn't go through the holes. A quick phone call confirmed that the later vehicles run the harnesses outside the chassis.
The original exhaust form the Y piece back was in a sorry state for itself. the main silencer was intact as it was stainless but the pipes going into it fell apart when I tried to unbolt it and the rest of the pipework to the rear was done for.
Rather than buying an off the shelf replacement I decided to build a stainless one using parts from Jetex, buying a selection of bends and straights and welding them together. This took some extra time but the end result should last for a while and it fits in all the right places.
I mounted the fuel filter on the front outrigger where it is at least partially protected but most importantly it was about the only place I could find where it would be accessible with the body on !
More pics....
Fuel tank
Fuel tank and exhaust
Fuel filter and pipes
Who is online
Users browsing this forum: No registered users and 12 guests