Corvette powered Defender
-
davew

- Chairman
- Posts: 2242
- Joined: Fri Jan 05, 2007 8:54 pm
- Location: Knaresborough
- Full Name: Dave White
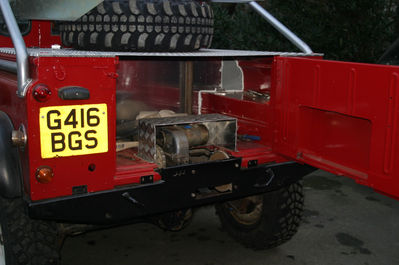
Spent today working on the load area. Added all the fittings to the new fuel tank first of all. Lots of measuring, re-measuring as each hole was cut for each of the fittings. Routed the return pipe into the internal swirl pot on this tank too.
Trimmed the new bulkhead down to fit the rather misshapen contours of the back body and then cut some pieces of aluminium to fill in the gaps at the edges where the body curves up and meets the capping.
Dropped the new fuel tank into position and modified the old fixing straps to work with the new tank and then plumbed the tank in. Sealed all the fittings with some adhesive PU stuff after first testing that, like the old brand, it doesn't go weird when in contact with petrol.
I had to strip a load of stuff from the cab side of the main bulkhead so I could safely drill through it to attach the aluminium angle for the front of the load bed cover to attach to. Riveted the angle on and sealed the rivets with the PU adhesive.
With everything fixed in place I could start cutting holes in the load bed cover, starting with the holes for the soft top hoop fixings at the back. Once they were cut it could get it's first trial fit... I know I shouldn't be surprised, particularly after reversing into that tree in Ireland, but the back body isn't what you'd call square.... After some judicious filing the cover went on and fits. I then had to cut a hole for the fuel filler to go through that had to be perfectly aligned with the filler on the tank.
Sods law meant I didn't have a hole cutter of the correct size so had to go with a 50mm one and file it out to 65 - not a fun job when you're working with 3mm checkerplate. On the plus side, the 50mm hole showed I was off centre relative to the tank filler so I could adjust it's position while filing the hole out.
With the filler cap lined up and attached, last job of the day was to get the vehicle mobile again by siphoning the fuel out of the old tank into the new. All seems to be working OK and it's mobile again - the cover will have to come off a few more times tomorrow though as I finish it all off with a hole for the snorkel to come through, a hole and cover in the main bulkhead so I can get to the hos clamps on the filler and an inspection hatch so I can get to the fuel pump, filters and regulator.
Not sure how I'll mount the spare wheel yet, the military bonnet mount I have is either missing some parts or I'm missing the point... anyone got any pics ?
While working on the motor I fielded a number of calls from suppliers including one from Ashcrofts, decided to take the plunge and order a full set of spares... I'll worry about the bank balance next week ! They should arrive tomorrow.
The tree strops from Devon 4x4 I bought don't meet the CCDA regs although Tim will be pleased to know that, for UK events, the ends are small enough to easily get a hook through Had to order some pukka ARB strops to meet the regs... obviously they were 10 times the price of the normal ones
Need to finish off the load bed tomorrow and make a start on fitting the new tunnel... better get out of my pit nice and early !
Trimmed the new bulkhead down to fit the rather misshapen contours of the back body and then cut some pieces of aluminium to fill in the gaps at the edges where the body curves up and meets the capping.
Dropped the new fuel tank into position and modified the old fixing straps to work with the new tank and then plumbed the tank in. Sealed all the fittings with some adhesive PU stuff after first testing that, like the old brand, it doesn't go weird when in contact with petrol.
I had to strip a load of stuff from the cab side of the main bulkhead so I could safely drill through it to attach the aluminium angle for the front of the load bed cover to attach to. Riveted the angle on and sealed the rivets with the PU adhesive.
With everything fixed in place I could start cutting holes in the load bed cover, starting with the holes for the soft top hoop fixings at the back. Once they were cut it could get it's first trial fit... I know I shouldn't be surprised, particularly after reversing into that tree in Ireland, but the back body isn't what you'd call square.... After some judicious filing the cover went on and fits. I then had to cut a hole for the fuel filler to go through that had to be perfectly aligned with the filler on the tank.
Sods law meant I didn't have a hole cutter of the correct size so had to go with a 50mm one and file it out to 65 - not a fun job when you're working with 3mm checkerplate. On the plus side, the 50mm hole showed I was off centre relative to the tank filler so I could adjust it's position while filing the hole out.
With the filler cap lined up and attached, last job of the day was to get the vehicle mobile again by siphoning the fuel out of the old tank into the new. All seems to be working OK and it's mobile again - the cover will have to come off a few more times tomorrow though as I finish it all off with a hole for the snorkel to come through, a hole and cover in the main bulkhead so I can get to the hos clamps on the filler and an inspection hatch so I can get to the fuel pump, filters and regulator.
Not sure how I'll mount the spare wheel yet, the military bonnet mount I have is either missing some parts or I'm missing the point... anyone got any pics ?
While working on the motor I fielded a number of calls from suppliers including one from Ashcrofts, decided to take the plunge and order a full set of spares... I'll worry about the bank balance next week ! They should arrive tomorrow.
The tree strops from Devon 4x4 I bought don't meet the CCDA regs although Tim will be pleased to know that, for UK events, the ends are small enough to easily get a hook through
Need to finish off the load bed tomorrow and make a start on fitting the new tunnel... better get out of my pit nice and early !
-
davew
- Chairman
- Posts: 2242
- Joined: Fri Jan 05, 2007 8:54 pm
- Location: Knaresborough
- Full Name: Dave White
Thanks Roger, might still have some Simex to fit back on the rims All help gratefully received.
Today started quite badly, first job was to measure out and cut the hole for the snorkel in the load cover. Spent ages trying to drill through it with a holecutter that I'd last used to drill a hole in stainless steel.... eventually gave up as it was just making a mess, went inside again and ordered a new one from Screwfix, fingers crossed it gets here tomorrow !
Back outside again and I drilled a 50mm access hole so I can tighten the fuel filler when the lid is on. Drilled and fitted grommets to the holes that will take the battery wires for the rear winch and then fixed and sealed the load space bulkhead into place, remembering to slide a piece of 3mm steel between it and the fuel tank when drilling holes
Modified the rear winch cover and cut yet more of the original load bed rails out so it sits down sqare on the load bed. Looks like the wiring will have to come out quite high to avoid the brake which is a shame but can't be helped.
Put the cover back on and measured out the spare wheel position and drilled it through so I can put a 10mm locating bolt in for the time being. Decided I was going to have to put one of the new Simex on a rim to check the position... had forgotten just how long it takes to torque up those 32 bolts half a turn at a time.
Still not sure how the spare wheel is going to be fixed on but have a couple of ideas now, assuming the hole saw arrives in the morning I'll take the lid off and see if I can fix the mount to the support.
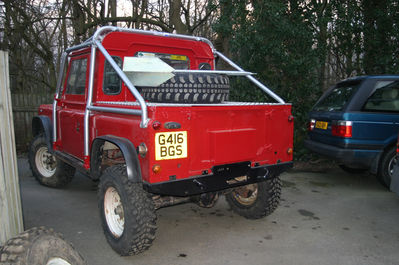
Started to take the old tunnel and the gearshift out, got fed up with the lack of light so fitted the new fluorescent light for the back of the cab. With plenty of light I got everything stripped out and did a trial fit of the new tunnel. Played around with the gearshift position so that the new cubby box will fit, looks like the gearshift will need a new mount making but it will all fit in.
Another day gone by and so much left to do... hope I get a good day tomorrow and get some more of the list ticked off. Heard from the fabricator that the snorkel welding has been completed so will collect the bits tomorrow evening.
On the plus side, I did get some photos taken
Today started quite badly, first job was to measure out and cut the hole for the snorkel in the load cover. Spent ages trying to drill through it with a holecutter that I'd last used to drill a hole in stainless steel.... eventually gave up as it was just making a mess, went inside again and ordered a new one from Screwfix, fingers crossed it gets here tomorrow !
Back outside again and I drilled a 50mm access hole so I can tighten the fuel filler when the lid is on. Drilled and fitted grommets to the holes that will take the battery wires for the rear winch and then fixed and sealed the load space bulkhead into place, remembering to slide a piece of 3mm steel between it and the fuel tank when drilling holes
Modified the rear winch cover and cut yet more of the original load bed rails out so it sits down sqare on the load bed. Looks like the wiring will have to come out quite high to avoid the brake which is a shame but can't be helped.
Put the cover back on and measured out the spare wheel position and drilled it through so I can put a 10mm locating bolt in for the time being. Decided I was going to have to put one of the new Simex on a rim to check the position... had forgotten just how long it takes to torque up those 32 bolts half a turn at a time.
Still not sure how the spare wheel is going to be fixed on but have a couple of ideas now, assuming the hole saw arrives in the morning I'll take the lid off and see if I can fix the mount to the support.
Started to take the old tunnel and the gearshift out, got fed up with the lack of light so fitted the new fluorescent light for the back of the cab. With plenty of light I got everything stripped out and did a trial fit of the new tunnel. Played around with the gearshift position so that the new cubby box will fit, looks like the gearshift will need a new mount making but it will all fit in.
Another day gone by and so much left to do... hope I get a good day tomorrow and get some more of the list ticked off. Heard from the fabricator that the snorkel welding has been completed so will collect the bits tomorrow evening.
On the plus side, I did get some photos taken
davew wrote:Thanks Roger, might still have some Simex to fit back on the rims
No-o-o-o-o-o...
No probs - I'll be there as soon as I can (probably around 12 but will phone to confirm)
davew wrote:
It looks so... minimalist...
Nice!
Roger (TwoSheds)
Decided I was going to have to put one of the new Simex on a rim to check the position... had forgotten just how long it takes to torque up those 32 bolts half a turn at a time.
i havent.....
i still have nightmares about manually putting them on your new rims and doing the bloody things up from when me and hadyn helped last time...
looking good, but the glossy paint does show up the dents in your bodywork a bit more (at least in the photos)
Bugger!
Another bloody dent...
Another bloody dent...
-
davew
- Chairman
- Posts: 2242
- Joined: Fri Jan 05, 2007 8:54 pm
- Location: Knaresborough
- Full Name: Dave White
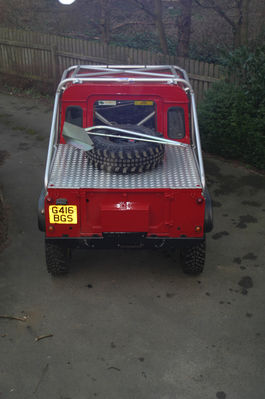
Yet more time spent on the load bed today. Hole saw arrived nice and early so took the cover off and drilled the hole for the snorkel. Refitted the cover and tried to figure out a way of drilling a similar hole in the inner wheel arch that lined up with the hole in the cover. Eventually took the plunge and drilled the hole and, by some miracle, the two holes lined up and the pipe slotted through both without any filing
Cut the old bonnet mount down and tacked it onto the bracing bar, drilled the 3 matching holes in the load cover and, again, the cover dropped into place... must have had enough sleep last night as my calibrated eyeball appears to be working !
Cut the access hole for the fuel pump and filters, checked and double checked all the fuel tank connections, finished welding the spare wheel mount on, ground down all the checker things around the fuel filler flange and finally put the cover back on for the last time.
Drilled, tapped and countersunk all the fixing holes for it and bolted it down. Spent the evening at Maddisons working on a 4.6 with a 4.0 Thor manifold. While I was over there I picked up the snorkel bits from the fabricator, all looking good so will try and get that fitted tomorrow.
-
davew
- Chairman
- Posts: 2242
- Joined: Fri Jan 05, 2007 8:54 pm
- Location: Knaresborough
- Full Name: Dave White
First job this morning was to fit another Simex to a rim while Pam ventured under the landie with a hosepipe and a bucket and sponge.
When it was safe to go near the motor again I set about the tunnel, mounting the gear change and transfer box lever into it. Had to remove and re-route the gear selector cable to try and give it a better line with the new position.
Made a start on running the snorkel through, finally cutting the hole in the seat support that I'd prepared for ages ago by welding extra bracing in. With that done I then had to disconnect and pull out all the battery cables so there was room for the snorkel to pass by. In the end the snorkel was built in 7 sections, each joined by a silicon hose of some description. 2 90 degree hoses are used to route it down the back of the engine, every where else I've used short pieces of straight hose to join the stainless pipe together. All sealed now to the air filter at the back - just need to add a couple of tags to secure it here and there.
For some reason the tickover seems to be higher with the new snorkel... not sure why.Maybe there is an increase in vacuum moving it into a different area of the fuel or spark map... can't believe it's more free flowing than the old setup.
Reconnected the vehicle feed to the battery and bolted the tunnel and gear selectors in making the vehicle movable. For some reason I decided to check that the cut out switch kills the engine... it doesn't Need to get a switch with additional contacts as the alternator on this engine seems more than happy to keep the vehicle running without a battery. Hopefully the mini spares place in Harrogate will have one in the morning.
When it was safe to go near the motor again I set about the tunnel, mounting the gear change and transfer box lever into it. Had to remove and re-route the gear selector cable to try and give it a better line with the new position.
Made a start on running the snorkel through, finally cutting the hole in the seat support that I'd prepared for ages ago by welding extra bracing in. With that done I then had to disconnect and pull out all the battery cables so there was room for the snorkel to pass by. In the end the snorkel was built in 7 sections, each joined by a silicon hose of some description. 2 90 degree hoses are used to route it down the back of the engine, every where else I've used short pieces of straight hose to join the stainless pipe together. All sealed now to the air filter at the back - just need to add a couple of tags to secure it here and there.
For some reason the tickover seems to be higher with the new snorkel... not sure why.Maybe there is an increase in vacuum moving it into a different area of the fuel or spark map... can't believe it's more free flowing than the old setup.
Reconnected the vehicle feed to the battery and bolted the tunnel and gear selectors in making the vehicle movable. For some reason I decided to check that the cut out switch kills the engine... it doesn't
-
davew
- Chairman
- Posts: 2242
- Joined: Fri Jan 05, 2007 8:54 pm
- Location: Knaresborough
- Full Name: Dave White
Another day gone... where does the time go ???
Got the tunnel sides shaped and ready to bolt in as well as the centre cover panel and the cover over the old rear winch hole.
Harrogate mini spares had an FIA switch so figured out where I could mount it so both occupants can turn it off whilst fastened in.
Cut a groove into the gearbox cross member to give the front prop a bit of a safety margin - set a piece of 2 inch tube into it so that, if the prop does touch, it doesn't hit an edge. For the first time since I fitted the new engine I have a gearbox cross member that has all 4 bolts in it ! (small victories are important at the moment)
Roger came around again and, as threatened, set about putting the remainder of the Simex on the rims. The low profile valves arrived this morning, was in two minds whether to fit them or stick with a known quantity. As Roger pointed out that having 3 low profile valves lowers the risk of ripping a valve off by up to 75%, it's officially Roger's fault if one of the new valves fails on the first stage They look the business though and don't rely on the valve to seal them.
Finally got around to welding an end plate on the near side sill protector.
Pam spent the day crawling around under the motor with a paint brush and the underneath now has 2 litres of hammerite on it.
Ran the wiring for the ignition switch part of the new cutout switch to the engine ECU, spent some time trying to figure out which circuit to break, I'd like to cut the power but that's not really practical with the way it's configured, will have to sleep on it.
Replaced the front winch solenoid and stripped the front winch mount, made up the battery cable for the new cut out switch and made up earth and power cables for the rear winch.
Got the tunnel sides shaped and ready to bolt in as well as the centre cover panel and the cover over the old rear winch hole.
Harrogate mini spares had an FIA switch so figured out where I could mount it so both occupants can turn it off whilst fastened in.
Cut a groove into the gearbox cross member to give the front prop a bit of a safety margin - set a piece of 2 inch tube into it so that, if the prop does touch, it doesn't hit an edge. For the first time since I fitted the new engine I have a gearbox cross member that has all 4 bolts in it ! (small victories are important at the moment)
Roger came around again and, as threatened, set about putting the remainder of the Simex on the rims. The low profile valves arrived this morning, was in two minds whether to fit them or stick with a known quantity. As Roger pointed out that having 3 low profile valves lowers the risk of ripping a valve off by up to 75%, it's officially Roger's fault if one of the new valves fails on the first stage
Finally got around to welding an end plate on the near side sill protector.
Pam spent the day crawling around under the motor with a paint brush and the underneath now has 2 litres of hammerite on it.
Ran the wiring for the ignition switch part of the new cutout switch to the engine ECU, spent some time trying to figure out which circuit to break, I'd like to cut the power but that's not really practical with the way it's configured, will have to sleep on it.
Replaced the front winch solenoid and stripped the front winch mount, made up the battery cable for the new cut out switch and made up earth and power cables for the rear winch.
-
davew
- Chairman
- Posts: 2242
- Joined: Fri Jan 05, 2007 8:54 pm
- Location: Knaresborough
- Full Name: Dave White
Early finish today, in before midnight
Pam spent another day cleaning and painting, while I continued to work my way through a seemingly endless list of jobs still to do. Was hoping to rustle up some help with a few phone calls but nobody turned up so just the two of us again.
Fitted the new recovery point onto the front winch mount as they are not allowed to stick out further than the bumper so the old one had to go. Would have fitted two but not enough time left.
Rebuilt the front winch as it was still in bits following it's demise at Greenhow. It now has a Gigglepin 4x4 strengthened brake shaft and uprated brake material. It wasn't cheap but, having now fitted one, I'll probably do the same for the rear winch after the OBC. As well as being a stronger shaft the design also takes out all the normal slop in the gears with everything locating positively.
With the winch and it's brake overhauled I fitted it all back onto the motor, wired it up and cut the front grill to suit. Fitted the new stainless steel fairlead - more bling !
Fitted the new XP motor to the rear winch, located the solenoid and made up some new cables to suit, again, fitted the bling stainless fairlead for the back
So we finally have two operational winches again !
Fitted the rear harness bar on the passengers side and played with repositioning the GPS aerial in an attempt to make some room for the spotlights, will have to have another go at that in the morning when I can use power tools.
Ready for one last push tomorrow to try and get as much done as possible. Can't see me getting everything done so am now down to trying to figure out what's essential and what I can take a gamble on. At the moment the cab is still stripped out with no seats so I guess that's a priority... and maybe some windscreen wipers would be good... and some rear lights... and a working GPS... some brake pads with more than 2mm on them... maybe some front hub oil seals that aren't leaking.... rear radius arm bushes that don't have 5mm of daylight... oh well.
Gosh that's a lot of important things still to do! Will there be any 'fettling time' once it's in Oz?
I'll pop round tonight and do your final Simex, be there at 7pm..
Don't get too wet today (Monday) in this 'perfect storm'...
p.s. This may matter later I have been thinking about the new valves and have decided that (contrary to what I said on Sunday) it would be quite easy to remove/replace them with the tyre still in the bead-locker. Remind me to try it tonight. If this works then you will have a backup for the valves in case they fail in some way (they are an untried technology as far as we are concerned) or in case you lose the dongle
Roger
I'll pop round tonight and do your final Simex, be there at 7pm..
Don't get too wet today (Monday) in this 'perfect storm'...
p.s. This may matter later
Roger
-
davew
- Chairman
- Posts: 2242
- Joined: Fri Jan 05, 2007 8:54 pm
- Location: Knaresborough
- Full Name: Dave White
Thanks Roger, I put the last Simex on the other night though... I'm pretty sure the valves can be fitted by breaking the bead on the inside of the rim and pushing the tyre in from the back. There looked to be plenty of room when I tried it the other day.
If you, or anyone else for that matter, fancies popping round this evening I'm sure I'll find something for you to do on the never ending list !
If you, or anyone else for that matter, fancies popping round this evening I'm sure I'll find something for you to do on the never ending list !
-
pamw

- Official
- Posts: 270
- Joined: Fri Jan 05, 2007 11:02 pm
- Location: Knaresborough, N Yorkshire
- Full Name: Pam White
We got home at 7.30 am - yes AM - this morning..... we have time for a quick break, a bacon buttie, lots of coffee and then back to Maddisons for around 10, then to load the container from 11 ....
A short list of things still to do but they can wait until we are in Oz..
I'm sure Dave will write a longer report later (or tomorrow, depending on how long he sleeps for when we finally get to put our feet up!).
Many many thanks to Roger and to Pete and Patrick. We would still be struggling now !
Pam (ZZZZZZZZZZZZZZZZZzzzzzzzzzzzzzzzzzz)
Archaeology - my career in ruins !
Who is online
Users browsing this forum: No registered users and 22 guests